

Hi! Picture this: It’s a sunny afternoon in my grandma’s backyard, and the air smells sweet. Her fig tree is full of ripe, juicy fruit, and instead of letting them spoil, she turns them into chewy snacks that last all winter. That’s my first memory of drying figs, and it’s always stayed with me. As a kid, I’d sneak a few from her jar, thinking they were the best treat. Now, it’s time to reveal the magic to you on how to dry figs at home.
Whether you are new to drying figs or have tried it before, this guide will walk you through each step. You’ll find simple methods, learn about the benefits, and get tips to avoid common mistakes. I’ll also explain why it’s worth getting fresh figs or a good dehydrator. After making your own dried figs, you might not want store-bought ones again.
Drying figs is fun, saves you money, and lets you enjoy that fresh-picked taste all year. In this article, you’ll learn how to dry figs, pick the best ones, and follow step-by-step methods for using the oven, sun, or a dehydrator. By the end, you’ll be ready to grab some fresh figs and make your own. Let’s get started!
- Why Dry Figs? The Amazing Benefits and Fun Uses:
- How to Pick the Best Figs for Drying: Top Varieties and Simple Prep Tips:
- Different Ways to Dry Figs: Step-by-Step with Every Possible Method:
- How to Dry Figs in the Refrigerator: A Slow and Gentle Method:
- How to Dry Figs on a String: Fun Hanging Method:
- Tips for Perfect Dried Figs:
- Common Mistakes When Drying Figs:
- FAQs About Drying Figs:
Why Dry Figs? The Amazing Benefits and Fun Uses:
First, why dry figs at all? Fresh figs taste great, but they only last about a week in the fridge. Drying figs removes their water content, so they keep for months or even years. Plus, there are some great health benefits.
Dried figs are more concentrated than fresh ones, so you get more nutrients in each bite. A handful provides plenty of fibre, which supports digestion and helps keep you feeling full. They also provide potassium for your heart, calcium for strong bones, and iron to support energy.
Studies show dried figs have more antioxidants than many other fruits, which helps keep you healthy. Fresh figs have about 30 calories each, but dried figs are sweeter and make a great, quick energy snack without the junk food.
Let me share a quick story. When I was in college, I was often short on money and always hungry. One summer, a friend gave me a bag of overripe figs from her yard. Instead of throwing them out, I tried sun-drying them like my grandma used to do. It worked, and I had snacks for weeks. They tasted better than candy bars, and I liked knowing they were natural. Now, I use dried figs in all kinds of recipes.

Wondering what to do with dried figs? You can eat them as a chewy, sweet snack. Add them to trail mix for hikes. Chop them up for cookies, cakes, or bread to add natural sweetness. You can also use dried figs in salads, stews, or pair them with cheese for a tasty appetiser.
If you want to use them in smoothies or jams, just soak them in water first. There are so many ways to enjoy them. If you want to try, buy fresh figs at your local market or order them online from places like Melissa’s Produce.
Drying figs makes their flavour stronger and keeps their nutrients. It’s one of the best ways to preserve fruit at home. Are you ready to try it?
How to Pick the Best Figs for Drying: Top Varieties and Simple Prep Tips:
Not all figs are good for drying. Choose figs that turn chewy and sweet instead of mushy or bland. Here’s what to look for.
Black Mission figs are one of the best choices for drying. They are small, purple-black, and become very sweet and chewy, perfect for snacks. Marseillaise figs are round and dry evenly, which many video guides recommend. Brown Turkey figs are large with a mild flavour, while Calimyrna figs, also called Sari Lop, have a nutty taste. If you live in a warm climate, Adriatic or Celeste figs also dry well and turn pleasantly chewy.
Pick figs that are ripe but still firm. If they are too soft, they could spoil, and if they are too hard, they’ll stay tough. They should smell sweet, not sour. Fresh figs work best for drying.
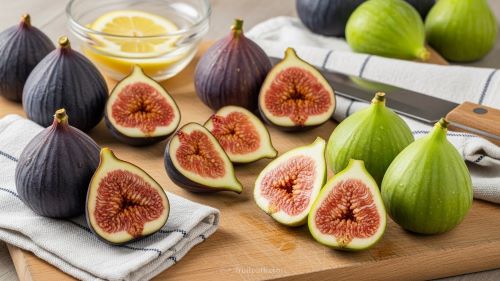
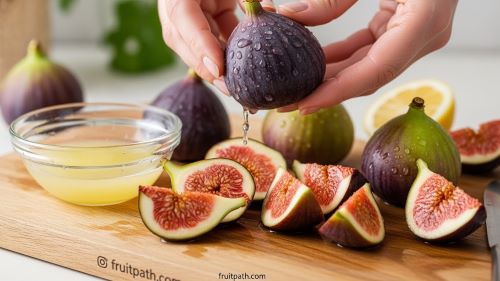
Preparing figs is simple. Wash them gently in cool water to remove any dirt. Pat them dry with a towel, as any remaining moisture can cause mould. Cut off the stems. If you want the figs to dry faster, slice them in half lengthwise to expose the inside. You can also dry them whole, but it will take longer.
Optional tip: Dip slices in lemon juice to keep colours bright and add a tangy twist. It is also recommended to blanch in boiling water for 30 seconds to crack the skin, which helps with even drying.
Not sure where to find fresh figs? Check local farms and grocery stores like Whole Foods, or order online from places like Farm to People. Fresh figs are in season from summer to fall, but dried figs are available all year. Choosing good-quality figs will give you tastier snacks, so it’s worth picking some up soon.
Different Ways to Dry Figs: Step-by-Step with Every Possible Method:
Now for the fun part: how to dehydrate figs. There are plenty of ways to do it, from old-fashioned to modern. I’ll guide you through each method, share the pros and cons, and include a story to make it more interesting.
How to Dry Figs in the Oven: A Simple and Reliable Way:
Oven-drying figs works well if you do not have special equipment. It’s similar to baking, just at a lower temperature for a longer time.
The way you can do it:
- Preheat your oven to the lowest temperature, around 140°F (60°C). If it’s higher, prop the door open with a spoon to improve airflow.
- Line a baking sheet with parchment paper. Place halved figs cut-side up, not touching.
- Place the tray in the oven and let the figs dry for 6 to 12 hours, turning them every few hours. Whole figs may take 12 to 24 hours to dry completely.
- Check if they’re ready by making sure the outside feels leathery and there’s no sticky juice left inside.
- Cool completely before saving and storing your dried figs.

The real-time guide: Set the oven temperature to 140°F. Fig slices usually take 8 to 12 hours, while whole figs need 12 to 24 hours. If you want softer figs, use a lower temperature, such as up to 120°F.
One rainy week, I couldn’t dry my figs outside, so I tried using the oven overnight instead. The next morning, the whole house smelled amazing, and my family finished the figs in just a few days!
Pros and Cons of Drying Figs in the Oven:
Pros:
- Oven drying is reliable and works no matter the weather, even on rainy or cold days.
- You do not need special equipment because most homes already have an oven.
- You can control the temperature and drying time well.
- Figs dry evenly if you turn them often.
- This method works well for drying medium or large batches.

Cons:
- Drying figs in the oven takes a long time, usually 6 to 12 hours, and sometimes up to 24 hours for whole figs.
- The oven-drying method uses more electricity than sun-drying or dehydrator use.
- You need to check and turn the figs regularly to keep them from over-drying.
- Oven temperatures can vary, so your results might be a little different each time.
This method works well when you can’t dry figs outside. As you mentioned, oven-dried figs are practical and fill your home with a warm, sweet smell that makes the wait worthwhile.
How to Dry Figs Naturally in the Sun: The Traditional Method:
Sun-drying figs doesn’t cost anything and brings out their rich, natural flavour. It works best if you have a sunny spot available.
Follow these steps to dry figs in the sun:
- Wash your figs and cut them in half.
- Place the figs, cut side up, on racks or trays. Use a mesh to protect them from insects.
- Set the trays in a sunny, breezy spot and cover them with netting.
- Bring the figs inside at night so they stay dry. Turn them over each day.
- Let the figs dry for 3 to 7 days, or until they are soft and flexible to the touch.
To dry figs on a string, thread whole figs onto twine and hang them outside in the sun. Adding bay leaves can help keep pests away.
The best part of this method is that it’s natural and makes the figs taste sweeter. The downside is that you need sunny weather and have to watch out for mould.
Here’s a tip I learned in Portugal: people soak dried figs in salt water to make them softer. I tried this while on vacation, and it really worked! You can also check out a sun-drying video for more ideas.

Pros and Cons of Drying Figs Naturally in the Sun:
Pros:
- Completely natural; you don’t need any machines or electricity.
- This method is free because it uses only sunlight and fresh air.
- It gives figs a rich, traditional, and sweeter flavour.
- It works well for larger batches if you have enough space.
- This is a time-tested method that has been used for generations.

Cons:
- It depends on sunny, dry weather, so it’s not good for humid or rainy areas.
- It takes several days, usually three to seven, for the figs to fully dry.
- This method needs daily attention, such as turning the figs and bringing them inside at night.
- There’s a risk of mold if the figs aren’t dried completely.
Insects and pests can be a problem without proper mesh or netting. This method is great if you like traditional food practices and have the right weather. With good airflow and some patience, sun-dried figs turn out deeply flavorful and naturally sweet.
How to Dry Figs in a Dehydrator: Simple and Quick:
If you want to dry figs often, consider buying a dehydrator. To find the best and most dependable ones, check trusted online stores and choose the latest models, as they offer more features.
Mentioned below are the steps for you:
- Arrange your dehydrator to 135°F (57°C) on the fruit setting.
- Place the halved figs skin-side down on the trays, making sure they don’t overlap.
- Let them dry for 6 to 12 hours. If you quarter the figs, they’ll take about 6 to 8 hours. Whole figs need at least 10 hours.
- Rotate the trays during drying to keep things even. The figs are ready when no moisture comes out if you squeeze them.
Using a dehydrator is accurate, uses less energy, and dries your figs evenly. It also works better than an oven when you have a lot of figs.
For example, my neighbour once bought a cheap dehydrator and ended up with unevenly dried figs. I decided to invest in an Excalibur, and now I use it for everything. It was worth every penny. It is recommended to always buy the best dehydrator for your home.

Pros and Cons of Drying Figs in a Dehydrator:
Pros:
- A dehydrator dries figs evenly because it maintains a steady temperature.
- It works especially well if you have a lot of figs to dry at once.
- It uses less energy than an oven when drying figs for a long time.
- The drying process is accurate and controlled, reducing the risk of burning or spoilage.
- It helps figs keep their natural sweetness, colour, and texture.
- After you set it up, you do not need to watch it much.
Cons:
- You need to buy a dehydrator, and some models can be expensive.
- If you use a cheap or low-quality dehydrator, your figs might dry unevenly.
- Drying figs in a dehydrator takes longer than using a microwave or air fryer.
- You will need to find space in your kitchen to store the dehydrator.

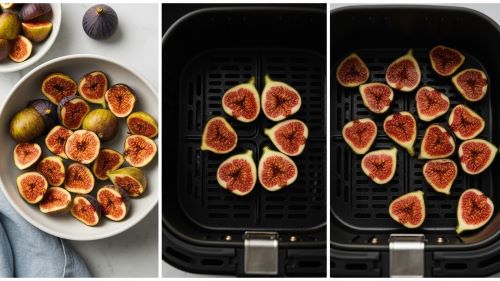
How to Dry Figs in an Air Fryer (Quick Method for Small Batches):
Using an air fryer is a quick and easy way to dry figs, especially if you only have a few and want a fast snack. You don’t need any special equipment. The air fryer circulates hotairaround the figs, drying them out fast while keeping the centres soft and chewy.
The Ideal way to do it:
- Wash the figs gently under clean water. Dry them well using a towel.
This step matters because any extra water will slow down the drying process. - Slice each fig in half from top to bottom.
If your figs are large, cut them into quarters instead. Cutting them this way helps them dry faster, allows heat to flow evenly, and gives a better texture. - Arrange the figs in the air fryer basket with the cut side facing up, making sure they’re in a single layer.
Be sure the figs aren’t touching or overlapping. - Set the temperature to the dry or dehydrate setting if your air fryer has one. If not, use 380°F or 193°C.
- Let the figs dry in the air fryer for 8 to 10 minutes, turning them every 2 to 3 minutes to ensure even drying.
- Watch them closely because:
- Air fryers heat fast.
- Figs can burn if left too long.

Check if the figs are done. They are ready when they:
- Feel dry to the touch.
- They should feel slightly firm but not hard.
- The centre should be chewy, not wet.
If the figs still feel soft or sticky, air fry them for another 1 or 2 minutes. Make sure air can move freely around each piece for the best results.
Helpful Tips for Great Results:
- Don’t overcrowd the basket.
- Start with a short drying time and check the figs often.
- Every air fryer is a little different, so the timing might vary.
- Let the figs cool before storing them. They’ll firm up as they cool.
Taste and Texture: Air-dried figs usually have:
- Lightly crispy edges,
- a soft, chewy centre,
- and a naturally sweet flavour.

You can enjoy figs as:
- a quick snack,
- A topping for yoghurt.
- A healthy sweet treat.
Tip: Avoid putting too many figs on yoghurt. This method is best for small batches.

Personal Note:
On a busy afternoon, I needed a quick snack and had only a few fresh figs. I tried drying them in the air fryer. In just minutes, they were ready: crispy on the outside and chewy inside. It felt like simple kitchen magic.
If you want quick results without waiting all day, give this air fryer fig-drying method a try.
Pros and Cons of Drying Figs in an Air Fryer:
Pros:
- Quick: Figs are ready in just 8 to 10 minutes, making them a great quick snack.
- Easy: All you need is an air fryer—no extra equipment needed.
- Great for small batches: This method works best when you just have a few figs to dry.
- Produces a nice texture: The figs turn out with crisp edges and a soft, chewy centre.
- Dries more evenly than a microwave, since the hot air circulates around the figs.

Cons:
- Not great for large batches: If you put in too many figs, the basket gets crowded.
- Figs can burn fast if you don’t keep an eye on them.
- Timing can vary depending on your air fryer, so you may need to try a few times to get it right.
- Requires attention: Turn the figs every few minutes to ensure even drying.
How to Dry Figs in the Microwave: Fast and Simple:
Microwaving figs is the fastest way to dry them, but you have to watch them closely. This method is best if you only have a few figs and want them ready quickly. It’s not perfect, but it works when you are short on time.
The microwave dries figs by rapidly heating the water inside them. Because of this, figs can burn if you are not careful. Use short bursts and watch them closely to avoid burning.
Here’s what to do:
- Start by washing the figs and thoroughly drying them. Cut them into thin slices so they dry faster and more evenly. Place a microwave-safe plate on a paper towel, then add another paper towel on top. This will help absorb excess moisture as the figs dry.
- Lay the fig slices on the plate in a single layer, making sure they don’t touch each other. Microwave them for 30 to 60 seconds at a time. After each round, take the plate out and flip the slices. This helps prevent burning and lets both sides dry evenly.
- Drying usually takes 2 to 5 minutes, depending on your microwave and the thickness of the slices. Stay nearby while they dry, because figs can burn quickly if left too long.
- When they’re ready, the figs should feel dry on the outside but still a bit chewy inside. If they’re still sticky or wet, microwave them for another short burst. Let them cool for a few minutes before eating. They will get firmer as they cool.
- Microwaving figs is quick, but the results can be uneven. Some pieces may get crispy while others stay soft. Still, this method is useful when you want speed more than perfect results.
A friend once shared a story about a late-night craving. She only had a couple of fresh figs, so she sliced them, put them on a paper towel-lined plate, and microwaved them in short bursts. In a few minutes, the figs were warm, soft, and a bit chewy. They weren’t perfect, but that quick snack hit the spot.

Pros and Cons of Drying Figs in the Microwave:
Pros:
- Very fast: figs are ready in just a few minutes.
- Great for tiny batches or when you only have a couple of figs.
- Easy: you only need a microwave and a plate.
- Great for a quick snack when you’re in a hurry.
Cons:
- Drying can be uneven: some pieces may get crispy while others stay soft.
- Figs can burn easily if left too long.
- Not suitable for large batches.
- Less control over texture compared to an air fryer or dehydrator.

How to Dry Figs in the Refrigerator: A Slow and Gentle Method:
Drying figs in the refrigerator is a slow process that gently preserves the fruit. Since there’s no heat involved, the figs dry out on their own, making their flavour richer and sweeter. They also shrink a little, so this method works well if you want to skip cooking.
Here’s how you can use this method:
1. Wash and dry the figs:
Rinse the figs gently under clean water, then dry them thoroughly with a towel. Any leftover moisture can cause the figs to spoil rather than dry out.
2. Prepare the plate:
Set the figs, skin-side down, on a plate, leaving space between them so air can circulate.
3. Refrigerate:
Place the plate in the refrigerator and let the figs dry for 2 to 3 weeks.
4. Wait and watch:
During this time, the figs will gradually lose moisture, shrink slightly, and taste sweeter. There’s no need to turn them or check on them frequently.
5. Check for readiness:
After 2 to 3 weeks, the figs should feel soft but drier than when fresh, with a naturally sweet taste. Enjoy them as a snack or add them to your favourite recipes.
Anecdote:
A friend once left a plate of figs in her fridge for a few weeks by accident. When she found them, they had dried out and tasted even sweeter, turning into a pleasant surprise.

Pros and Cons of Drying Figs in the Refrigerator:
Pros:
- No heat is needed, so the figs are treated gently.
- This method is simple and requires very little effort.
- It helps bring out the figs’ natural sweetness and flavour.
- There’s almost no risk of burning or overcooking the figs.
Cons:
- This process is slow and takes about 2 to 3 weeks.
- You won’t get crispy edges or a chewy texture as you might with other methods. It’s not the best choice for large batches unless you have lots of fridge space. Since it takes time, it’s not great for last-minute snacks.

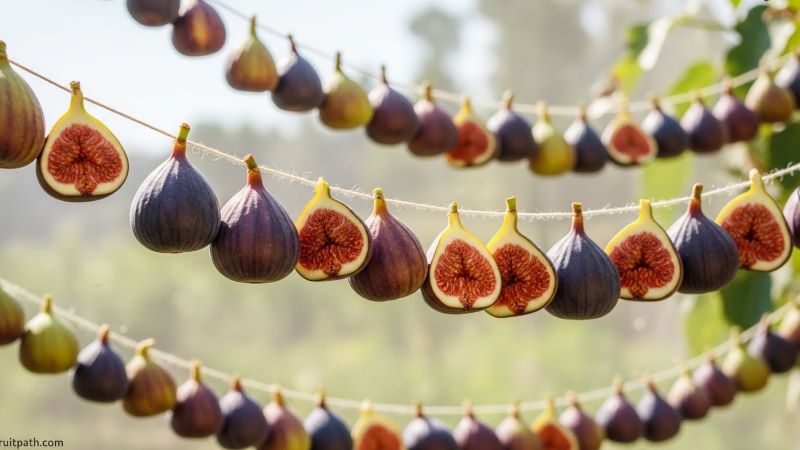
How to Dry Figs on a String: Fun Hanging Method:
Drying figs on a string is a fun and natural way to air-dry them. It takes some time, but it brings out the flavour and keeps the figs soft. This method also feels a bit playful, almost like a craft project while you dry fruit.
Step-by-Step: Drying Figs on a String:
- Prepare the figs:
Wash the figs gently under clean water and dry them completely. Cut them in half if you like, or keep them whole.
2. Thread the figs:
Take a strong piece of string and carefully thread the figs onto it, leaving a little space between each fig so air can circulate.
3. Hang the figs
Hang the string indoors with a gentle fan, or outside in a dry, sunny, and breezy place. Make sure the figs do not touch each other.
4. Dry slowly
Leave the figs to dry for 3 to 7 days, depending on the size and moisture content. Check regularly for any signs of mould or spoilage.
5. Airflow matters
Good airflow is important. Stay away from damp places or wet conditions, as these can cause the figs to get mouldy rather than dry.
Anecdote:
A friend of mine tried this with her kids. They called it a “fig necklace” because the figs were on a string. The kids enjoyed helping hang the figs, and it made a simple drying task into a fun project.
Pros and Cons of Drying Figs on a String:
Pros:
- Naturally, no heat required.
- Fun and interactive, so kids or family can help.
- Concentrates sweetness and flavour.
- Soft and naturally chewy figs.
Cons:
- Slow, since it takes 3-7 days.
- Needs careful airflow to avoid mold.
- Not ideal for very large batches unless you have a long space to hang strings.
- Results can vary depending on weather or indoor conditions.

Tips for Perfect Dried Figs:
Drying figs is easy, but a few simple tips can really improve their taste, texture, and how long they last. No matter if you use an oven, air fryer, microwave, fridge, or string, these steps will help you get great results every time.
1. Wash and Slice Figs Properly:
Start by gently washing your figs under clean water to remove any dust or dirt. After that, dry them well with a clean towel or paper towel. If figs are still wet, they might spoil instead of drying properly.
If you plan to slice your figs, try to cut them all the same size. Thin, even slices dry faster and more evenly, while bigger or uneven pieces can stay wet inside. Slicing also helps heat or air move around the figs, no matter which drying method you use.
2. Use Lemon Juice to Preserve Colour:
Figs often get darker as they dry, especially in hot weather. Dipping them quickly in lemon juice or a lemon-water mix helps keep their natural color and adds a little tangy flavor. This works especially well for figs dried in the oven or the sun.
This also slows down oxidation, so your dried figs look fresher and more appealing.
3. Avoid Mold by Ensuring Full Drying:
One of the most important things is to make sure your figs are fully dried. If they stay soft or wet inside, they can get mouldy while stored.
Check your figs by gently squeezing them. They should feel a bit firm but still chewy. If they are sticky, soft, or wet, keep drying them until they reach the right texture.
Good airflow is important, too. No matter what kind of technique you are using, if you use an air fryer, oven, or string, make sure the figs have space around them and aren’t stacked on top of each other.
4. Optional Sugar Dip for Sweet Treats:
If you want a candy-like treat, dip your figs in sugar syrup or sprinkle a little sugar on them before or after drying. By doing this, you give them a sweet, shiny finish and make them a fun snack or gift.
This step is optional, but it’s a great way to make dried figs more appealing for kids, parties, or homemade treats.
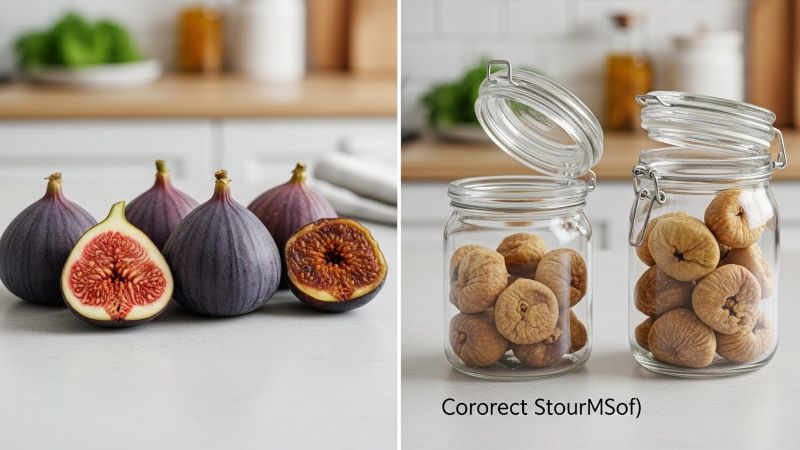
5. Storage Tips:
After your figs are fully dried, put them in airtight containers and store them in a cool, dry spot. Well-dried figs can last for months. If you live somewhere hot, storing them in the fridge can help them last even longer.
Check your dried figs now and then for any signs of moisture or mold, especially if your area is humid.

Quick Recap for Perfect Dried Figs:
- Wash and dry your figs well.
- Slice them evenly so they dry faster and more evenly.
- Dip in lemon juice if you want to keep their color bright.
- Dry them fully to prevent mold. You can check by gently squeezing the figs.
- Try a sugar dip if you want a candy-like treat.
- Store your figs in airtight containers to help them last longer.
Common Mistakes When Drying Figs:
Drying figs is easy, but small mistakes can ruin your hard work. Many people dry figs for the first time and end up with figs that are too hard, spoiled, or moldy. Knowing these common mistakes can help you get safe, tasty, and long-lasting dried figs.
1. Over-Drying the Figs:
One of the biggest mistakes is drying figs for too long. Over-dried figs become hard, brittle, and tough to chew. They lose their soft and chewy texture and are not enjoyable to eat.
Dried figs should feel firm but still flexible. If they snap or break when bent, they are over-dried. Always check your figs often, especially when using fast methods like the microwave or air fryer.
2. Under-Drying the Figs:
Under-drying is just as risky as over-drying. Figs that are still wet or sticky inside can spoil quickly and may grow mold during storage.
A simple test is to gently squeeze the fig. It should not release moisture or feel wet inside. If it does, it needs more drying time. Always dry figs fully before storing them.

3. Using Poor-Quality or Overripe Figs:
Drying does not fix bad figs. If you start with figs that are bruised, damaged, or already going bad, the dried result will also be poor.
Always use fresh, clean, and healthy figs. Slightly ripe figs work best because they dry well and taste sweeter after drying.
4. Storing Dried Figs the Wrong Way:
Even perfectly dried figs can spoil if stored incorrectly. Leaving dried figs in open containers or damp places allows moisture to return, leading to mold.
Store dried figs in airtight containers and keep them in a cool, dry place. In hot or humid weather, storing them in the refrigerator is a safer option.
5. Drying Figs in High Humidity:
High humidity is the enemy of drying figs. In damp weather, figs may not dry properly and can mold instead.
If you live in a humid area, avoid sun drying or string drying outdoors. Use indoor methods like an oven, dehydrator, or air fryer, and make sure there is good airflow.
Learning from Mistakes:
My friend once dried figs on a humid day and stored them in a loose container. Within a week, they spoiled. After learning from that mistake, she now dries figs fully and stores them in airtight jars. Her figs last much longer and taste much better.
Learning from small mistakes can save time, money, and effort. For deeper explanations and fixes, you can explore the full mistakes guide and improve your fig drying results every time.
FAQs About Drying Figs:
Will figs ripen if you pick them green?
No, figs will not ripen once they have been picked.
If you pick a fig while it is still green, it will stay hard and have little flavor.
Figs need to ripen completely on the tree to turn sweet and soft.
What is the gross truth about figs?
Some figs are pollinated by small fig wasps as they grow.
This is a natural part of how figs grow, and the wasp is completely broken down inside the fruit.
You are not eating a whole insect, and store-bought figs are safe to eat.
When to pick figs for drying?
Pick figs when they are fully ripe and feel a little soft to the touch.
They should hang down from the tree and have a rich, deep color.
Figs that are a little overripe will dry better and taste sweeter once dried.
Is there a bug inside every fig?
No, not all figs have a wasp inside.
Many figs grown today do not need wasps for pollination.
Figs you buy at the store are safe and do not have bugs inside.