Description
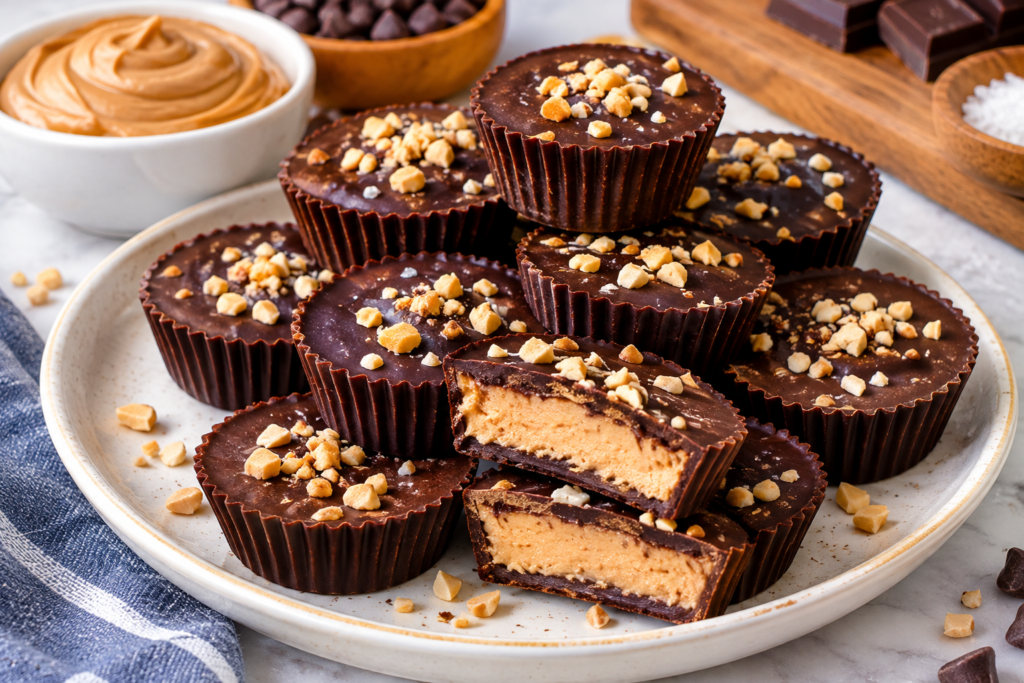
These Ice Cube Tray Chocolate Peanut Butter Cups are a delicious little treat made with rich chocolate and creamy peanut butter. Using an ice cube tray makes perfectly portioned bite-sized cups that are easy to freeze, store, and grab whenever a chocolate craving hits.
The combination of smooth chocolate and salty-sweet peanut butter creates a classic flavor pairing, while Greek yogurt and protein powder can add a satisfying protein boost. With a suitable low-carb sweetener and sugar-free chocolate, they can also fit into a lower-carb, high-protein snack routine.
Can This Chocolate Peanut Butter Cups Recipe Support Weight Loss Goals?
These treats can fit into a balanced eating pattern when enjoyed in appropriate portions. Peanut butter provides protein and fat, while Greek yogurt and protein powder can increase the protein content and make each serving more satisfying. Using smaller ice cube tray portions also makes it easier to control serving size.
However, chocolate and peanut butter are calorie-dense ingredients, so portion size and the overall day’s intake still matter.
Does This Recipe Fit a High-Protein Lifestyle?
Yes, this version uses Greek yogurt and protein powder alongside peanut butter to make the cups more protein-focused than traditional peanut butter cups.
Sugar-free dark chocolate helps keep the added sugar lower, while peanut butter contributes healthy fats and some protein.
The net carbs can remain relatively low when you use an appropriate sugar-free chocolate and sweetener.
The exact nutrition depends on your protein powder, chocolate, peanut butter, and yogurt brands.
They work especially well as a convenient high-protein dessert or snack.
My Personal Experience
- The chocolate and peanut butter combination is hard to resist:
The slightly bitter chocolate balances the creamy, salty peanut butter center.
Each frozen bite gives you a satisfying combination of textures. - The ice cube tray makes perfect portions:
Each compartment creates a naturally small serving size.
This also makes the cups easy to freeze and store. - The protein filling stays creamy:
Greek yogurt creates a smooth center rather than a completely hard peanut butter layer.
After a few minutes at room temperature, the texture becomes softer and creamier. - They are excellent for meal prep:
You can prepare a full tray at once and keep the cups frozen for later.
This makes them convenient when you want a quick sweet snack.
Perfect For:
These chocolate peanut butter cups are ideal for high-protein snacks, low-carb desserts, keto-style treats, freezer snacks, meal prep, post-workout snacks, chocolate cravings, easy no-bake desserts, and portion-controlled sweets.
They can also work as a high-protein breakfast treat when paired with a more substantial protein-rich breakfast.
Why You’ll Love This Recipe:
- No complicated baking:
The cups are assembled and chilled rather than baked in an oven.
That makes them especially convenient for quick dessert preparation. - Classic chocolate-peanut butter flavor:
Rich chocolate surrounds a creamy peanut butter filling.
The combination tastes indulgent even though the portions are small. - Protein-focused filling:
Greek yogurt and protein powder increase the protein content of the center.
This makes them different from traditional peanut butter cups. - Easy portion control:
An ice cube tray creates small individual cups.
You can take out only the amount you want and keep the rest frozen. - Freezer-friendly:
The cups stay convenient for weeks when stored properly.
They can be enjoyed directly from the freezer or softened briefly before eating.
Common Mistakes to Avoid:
- Overheating the chocolate: Melt it gently because excessive heat can make chocolate thick or grainy.
- Making the chocolate layer too thin: A slightly thicker bottom and top layer helps the cups hold together.
- Using watery yogurt: Excess liquid can make the peanut butter filling too loose.
- Overfilling the tray: Leave enough room for the final chocolate layer to completely cover the filling.
Required Equipment:
- Silicone ice cube tray — makes removing the frozen cups easy without breaking them.
- Microwave-safe bowl — allows the chocolate to melt safely in short intervals.
- Small mixing bowl — makes combining the protein filling quick and easy.
- Small spoon or piping bag — helps distribute the chocolate and filling neatly.
- Freezer-safe container — protects the finished cups from freezer odors.
Storage Instructions:
Once fully frozen, remove the cups from the ice cube tray and transfer them to an airtight freezer-safe container or zip-top freezer bag.
- Freezer: Store for approximately 1–2 months for the best flavor and texture.
- Refrigerator: Store in an airtight container for up to 5 days.
- Place parchment paper between layers if stacking them.
- Serving: Eat directly from the freezer for a firmer texture or let them sit at room temperature for 5–10 minutes for a softer center.
- Do not leave the yogurt-based filling at room temperature for extended periods.
Recipe Details
Preparation Time: 15 minutes
Chilling Time: 1–2 hours
Total Time: 1 hour 15 minutes–2 hours 15 minutes
Servings: 12 cups
Best Season: All-season
Total Calories: Approximately 145 calories per cup
Short 3-Line Description
Creamy peanut butter meets rich chocolate in these easy freezer-friendly treats.
Greek yogurt and protein powder make the filling more high-protein friendly.
Made in an ice cube tray for simple, bite-sized portions.
📝 Ingredients
Chocolate Shell
- 1 cup (170 g) sugar-free dark chocolate chips
- 1 teaspoon coconut oil
Protein Peanut Butter Filling
- ½ cup (125 g) natural creamy peanut butter
- ⅓ cup (80 g) plain Greek yogurt
- ¼ cup (25 g) vanilla protein powder
- 1 tablespoon powdered monk fruit or erythritol, optional
- ½ teaspoon vanilla extract
- ¼ teaspoon sea salt
Optional Toppings
- Chopped peanuts
- Unsweetened coconut flakes
- A tiny sprinkle of flaky sea salt
- Sugar-free mini chocolate chips
Ingredient note: Use a peanut butter with minimal added sugar for a lower-sugar version. Choose chocolate and protein powder according to your preferred carbohydrate target.
Directions
1. Prepare the tray
Place a clean 12-compartment silicone ice cube tray on a flat surface that fits inside your freezer.
Using a silicone tray makes the finished cups much easier to remove.
2. Melt the chocolate
Add the sugar-free chocolate chips and coconut oil to a microwave-safe bowl.
Microwave at 50% power for 20–30 seconds at a time, stirring after each interval.
Continue until the chocolate is smooth and glossy.
3. Create the bottom layer
Add approximately 1 teaspoon of melted chocolate to each ice cube compartment.
Tilt the tray gently so the chocolate covers the bottom evenly.
Place the tray in the freezer for 5–10 minutes, just until the chocolate is firm.
4. Prepare the protein peanut butter filling
In a small bowl, combine the peanut butter, Greek yogurt, protein powder, vanilla, sweetener, and salt.
Stir until smooth and creamy.
The mixture should be thick enough to hold its shape without running.
5. Add the filling
Place approximately 1–1½ teaspoons of the peanut butter mixture into each chilled chocolate compartment.
Keep the filling in the center rather than spreading it all the way to the edges.
6. Add the chocolate top
Spoon the remaining melted chocolate over each filling portion.
Make sure the peanut butter mixture is completely covered.
The chocolate should form a smooth top layer.
7. Add optional toppings
Before the chocolate sets, sprinkle a tiny amount of chopped peanuts or flaky sea salt over the top.
Avoid adding too much topping because the cups are small.
8. Freeze
Place the tray in the freezer for approximately 1–2 hours.
The cups are ready when the chocolate is completely firm and the filling feels set.
9. Remove from the tray
Gently flex the silicone tray and pop out each cup.
If they feel stuck, allow the tray to sit at room temperature for 1–2 minutes.
10. Serve
Enjoy them directly from the freezer for a firm chocolate shell or let them sit for 5–10 minutes for a softer, creamier filling.
For a more protein-rich snack, serve one cup alongside Greek yogurt or another protein-rich food.
Nutrition Facts
Per Serving – Approximate
- Calories: 145 kcal
- Total Fat: 10 g
- Cholesterol: 2 mg
- Sodium: 85 mg
- Potassium: 145 mg
- Total Carbohydrates: 10 g
- Fiber: 3 g
- Net Carbs: 7 g
- Sugars: 1 g
- Protein: 6 g
- Calcium: 35 mg
Nutrition values are approximate and can vary substantially depending on the chocolate, peanut butter, protein powder, yogurt, and sweetener brands used.
Notes
- Storage: Keep finished cups refrigerated for up to 5 days or frozen for 1–2 months.
- Reheating: No reheating is necessary; simply allow frozen cups to soften for a few minutes before eating.
- Allergy note: This recipe contains peanuts and dairy. Chocolate and protein powder may contain additional allergens depending on the brand.
- Nut-free option: Use sunflower seed butter instead of peanut butter.
- Flavor boost: Add a pinch of espresso powder to the melted chocolate for a deeper chocolate flavor.
- Extra crunch: Add finely chopped roasted peanuts to the filling.
- Protein tip: Choose a protein powder with a higher protein content and lower added sugar.
Frequently Asked Questions
1. Can I use regular chocolate instead of sugar-free chocolate?
Yes, but the calories, sugar, and carbohydrate values will increase.
2. Can I use crunchy peanut butter?
Absolutely, and it will give the cups a delicious nutty crunch.
3. Can I make these without protein powder?
Yes, simply omit it, although the protein content will be lower and the filling may be softer.
4. Do I have to use an ice cube tray?
No, a silicone mini-muffin tray or small candy mold can also be used.
5. How long should I freeze them?
Usually 1–2 hours is enough for the chocolate shell and filling to become firm.
6. Can I make these keto-friendly?
You can make a lower-carb version by choosing keto-friendly chocolate, peanut butter, yogurt, protein powder, and sweetener and checking their nutrition labels.