
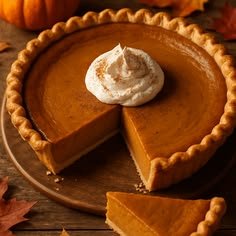
Description
This Real Pumpkin Pie is the classic holiday dessert everyone looks forward to, made with real pumpkin puree, warm spices, creamy evaporated milk, and a flaky buttery crust. The filling bakes into a silky, custard-like texture with just the right balance of sweetness and pumpkin flavor.
It’s a comforting homemade dessert that works beautifully for Thanksgiving, Christmas, or a cozy fall gathering. While traditional pumpkin pie isn’t naturally high-protein or low-carb, a few ingredient swaps can make it more suitable for those eating a high-protein or lower-carb diet.
Can This Real Pumpkin Pie Support Weight Loss Goals?
Traditional pumpkin pie can be enjoyed as part of a balanced eating pattern when portion size and overall intake are considered. Pumpkin provides fiber and nutrients, while the eggs contribute some protein. For a lighter version, you can reduce the sugar slightly, use a thinner crust, or make a crustless pie.
Does Real Pumpkin Pie Fit a High-Protein Lifestyle?
Traditional pumpkin pie provides some protein from eggs and evaporated milk, but it isn’t naturally a high-protein dessert. Pumpkin contributes fiber and keeps the filling satisfying, while the crust contributes most of the additional carbohydrates. For a more protein-focused version, serve a smaller slice with plain Greek yogurt or use a higher-protein crust. The net carbs will vary depending on the crust and sweetener used.
My Personal Experience
- The filling has that classic silky pumpkin texture.
The eggs and evaporated milk create a smooth custard that sets beautifully in the oven.
Every slice stays creamy without becoming overly dense. - The spice blend makes the pumpkin flavor shine.
Cinnamon, ginger, nutmeg, and cloves give the pie its familiar warm holiday aroma.
A small amount of vanilla adds another layer of sweetness. - The homemade filling is incredibly easy to prepare.
Everything can be whisked together in one bowl before going directly into the crust.
There is no complicated custard-making process. - It tastes even better chilled.
Letting the pie cool completely allows the filling to finish setting.
The flavors also become more developed after several hours in the refrigerator.
Perfect For
- Thanksgiving dessert
- Christmas gatherings
- Fall baking
- Family dinners
- Holiday brunches
- Pumpkin lovers
- Homemade dessert tables
- Cozy weekend baking
- High-protein meal plans when paired with Greek yogurt
- Lower-carb meal plans when made with a suitable crust or served crustless
Why You’ll Love This Recipe
- Classic pumpkin flavor
Real pumpkin puree and traditional warm spices create an unmistakable homemade pumpkin pie. - Creamy custard filling
Eggs and evaporated milk produce a smooth, rich texture without complicated techniques. - Easy one-bowl filling
Simply whisk the ingredients together and pour them into the prepared crust. - Perfect holiday dessert
The warm spices and beautiful orange filling make it ideal for Thanksgiving and Christmas. - Make-ahead friendly
The pie can be baked a day ahead and chilled until you’re ready to serve.
Common Mistakes to Avoid
- Using pumpkin pie filling instead of pumpkin puree — Pie filling already contains sugar and spices, which can throw off the recipe.
- Overbaking the pie — Remove it while the center still has a slight jiggle to prevent cracks and a dry texture.
- Cutting it while hot — The custard needs time to cool and set for clean slices.
- Skipping the crust protection — Cover the crust edges with foil if they brown too quickly during baking.
Required Equipment
- 9-inch pie dish — Provides the proper depth and shape for the filling.
- Large mixing bowl — Gives plenty of room to whisk the custard evenly.
- Whisk — Creates a smooth filling without lumps.
- Measuring cups and spoons — Keep the sugar and spices accurately balanced.
- Pie shield or aluminum foil — Protects the crust edges from excessive browning.
- Wire cooling rack — Helps the pie cool evenly after baking.
Storage Instructions
Refrigerator
Allow the pie to cool completely, then cover it tightly with plastic wrap or aluminum foil.
Refrigerate for up to 4 days.
Freezer
For longer storage, wrap individual slices tightly in plastic wrap and place them in a freezer-safe container or bag.
Freeze for approximately 1–2 months for best quality.
Thawing & Serving
Thaw frozen slices overnight in the refrigerator.
Pumpkin pie is usually best served chilled or slightly cool rather than reheated.
For a protein-friendly serving, add a spoonful of plain Greek yogurt instead of a large amount of whipped cream.
Recipe Details
Preparation Time: 15 minutes
Cooking Time: 50–60 minutes
Cooling Time: 2 hours
Total Time: Approximately 3 hours 15 minutes
Servings: 8 slices
Best Season: Fall and winter
Total Calories: Approximately 325 calories per slice
Short 3-Line Description
Creamy real pumpkin filling, warm spices, and a flaky crust make this classic pumpkin pie a holiday favorite.
It has a silky custard texture with plenty of cinnamon, ginger, nutmeg, and vanilla flavor.
Serve it chilled with Greek yogurt or whipped cream for an extra-special dessert.
📝 Ingredients
Pie Filling
- 1 can (15 oz / 425 g) pure pumpkin puree
- ¾ cup granulated sugar
- 2 large eggs
- 1 can (12 oz / 354 ml) evaporated milk
- 1 teaspoon vanilla extract
- 1½ teaspoons ground cinnamon
- ½ teaspoon ground ginger
- ¼ teaspoon ground nutmeg
- ⅛ teaspoon ground cloves
- ½ teaspoon salt
Crust
- 1 9-inch unbaked pie crust, homemade or store-bought
Ingredient note: Use pure pumpkin puree, not pumpkin pie filling. If using a deep-dish pie plate, you may need slightly more filling or a little extra baking time.
Directions
1. Preheat the Oven
Preheat your oven to 425°F (220°C).
Place the unbaked pie crust into a 9-inch pie dish and crimp the edges.
2. Make the Pumpkin Filling
Add pumpkin puree, sugar, eggs, evaporated milk, vanilla, cinnamon, ginger, nutmeg, cloves, and salt to a large bowl.
Whisk for approximately 1–2 minutes, until completely smooth.
High-protein tip: For a more protein-focused serving, plan to serve a moderate slice with plain Greek yogurt rather than increasing the sugar or crust portion.
3. Fill the Crust
Pour the pumpkin mixture into the unbaked pie crust.
Leave a small amount of space near the top because the filling will puff slightly during baking.
4. Begin Baking
Place the pie in the 425°F (220°C) oven.
Bake for 15 minutes.
The higher initial heat helps the crust begin browning and the filling start setting.
5. Reduce the Temperature
After 15 minutes, reduce the oven temperature to 350°F (175°C).
Continue baking for approximately 35–45 minutes.
6. Check for Doneness
The outer portion of the filling should look set while the center should still have a slight gentle jiggle.
A knife inserted near the center should come out mostly clean.
7. Protect the Crust
If the crust edges become dark before the filling is finished, loosely cover them with aluminum foil or a pie shield.
This allows the filling to continue cooking without over-browning the crust.
8. Cool Completely
Remove the pie from the oven and place it on a wire rack.
Allow it to cool for at least 2 hours.
The center will continue to set as the pie cools.
9. Chill
For the best texture, cover the cooled pie and refrigerate it for at least 2 hours before slicing.
10. Serve
Slice with a sharp knife and serve chilled or slightly cool.
Top with a small spoonful of whipped cream, Greek yogurt, or a sprinkle of cinnamon.
Nutrition Facts
Per Serving – Approximate
- Calories: 325 kcal
- Fat: 14 g
- Cholesterol: 70 mg
- Sodium: 360 mg
- Potassium: 260 mg
- Total Carbohydrates: 45 g
- Fiber: 3 g
- Net Carbs: 42 g
- Sugars: 27 g
- Protein: 7 g
- Calcium: 130 mg
Nutrition is an approximate estimate and will vary depending on the pie crust, pumpkin brand, and ingredient brands used.
Notes
- Storage: Keep covered and refrigerated for up to 4 days.
- Freezing: Freeze individual slices for approximately 1–2 months.
- Reheating: Pumpkin pie is best served chilled, but individual slices can be gently warmed for about 10–15 seconds if desired.
- Allergy note: Contains eggs, dairy, and wheat if a traditional flour-based crust is used.
- Flavor boost: Add a tiny pinch of allspice or extra cinnamon for a deeper spice flavor.
- Protein boost: Serve with plain Greek yogurt or a high-protein whipped topping.
- Lower-carb option: Use a low-carb crust and a suitable sugar substitute, keeping in mind that the nutrition values will change.
- Texture tip: Don’t wait until the entire center looks completely firm in the oven; a slight jiggle helps prevent overbaking.
Frequently Asked Questions
1. Can I use fresh pumpkin instead of canned pumpkin?
Yes, but make sure the homemade pumpkin puree is thick and well-drained so it doesn’t add excessive moisture.
2. Why is my pumpkin pie cracked?
Cracks usually happen when the custard is overbaked or cooled too quickly.
3. Does pumpkin pie need to be refrigerated?
Yes, because the filling contains eggs and dairy, so leftovers should be refrigerated.
4. Can I make pumpkin pie ahead of time?
Yes, pumpkin pie is excellent for making a day ahead because chilling allows the filling to fully set.
5. Can I make this pie without a crust?
Yes, pour the filling into a well-greased pie dish and bake it as a crustless pumpkin custard, adjusting the baking time as needed.
6. How do I make pumpkin pie more protein-friendly?
Serve a smaller slice with plain Greek yogurt or use a higher-protein crust and dairy ingredients.